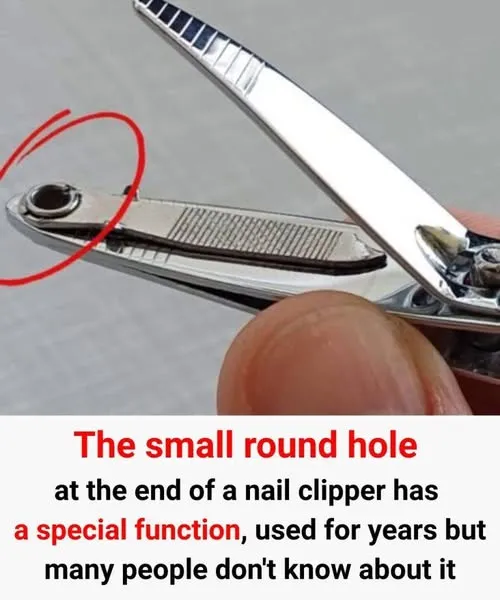
Short answer: that small round hole at the end of the lever is a simple multipurpose design feature — its main job is to
lock the lever in place when the clipper is closed (for storage or travel).
It also enables a few handy secondary uses (keyring attachment, lever removal/use), and helps the clipper work reliably as a lever.
Below is the detailed, practical, and “why it matters” explanation.
A typical foldable nail clipper has three main parts:
the two cutting jaws
the body (two springy metal pieces riveted together), and
the lever (the thin flat metal piece you press down).
The lever pivots on a small pin/rivet. When you press the lever, it applies force through that pivot to the blades, making the cutting action. The little round hole at the lever’s far end is sized to fit over the rivet head or a small pin on the clipper body.
Locking for safety/travel: push or fold the lever down so the blades are closed, then slip that round hole over the rivet head or small bump on the body. That “hooks” the lever and
Keeps the lever from rattling: with the hole hooked, the lever can’t flop or produce noise.
Prevents accidental pressure: it reduces the chance the lever will be pressed in your bag and clip something unintentionally.
This latch function is the reason the hole is located and sized the way it is — it’s a cheap, robust way to secure the moving part without adding extra hardware.
Keyring or lanyard attachment: you can thread a small keyring, cord, or chain through the hole so the clipper becomes a keychain tool. (Very handy for travel-sized clippers.)
Lever removal & alternate use: you can remove the lever by sliding it off the rivet; the hole can then be used to anchor the lever back onto the clipper in a different orientation (some people flip it and hook it to turn the lever into a short nail file or to get a slightly different angle for cutting).
Nail cleaner tool: the opposite end of many clippers (near the pivot) has a thin point or small protrusion intended as a nail-cleaner — removing or rotating the lever can make that implement easier to use.
Compact storage: when hooked, the tool is flatter and easier to store without the lever sticking out.
Note: some novelty or multi-tool clippers incorporate the hole (or a nearby notch) into extra features (mini bottle opener, screwdriver, etc.), but that’s not the hole’s original purpose on standard clippers.
To lock the clipper closed:
Fold the lever down so the cutting jaws are closed.
Rotate the lever until the small round hole lines up with the rivet head or small post on the clipper body.
Slip the hole over the rivet head until it sits snugly — the lever is now hooked and the clipper locked.
To remove the lever (for cleaning or alternate use):
Open the lever away from the body so it is at 90° or straight.
Pull the lever away from the rivet — on most cheap clippers it slides off with a little force. (Some clippers are riveted permanently; don’t force those.)
Clean/sterilize parts, then reassemble by threading the lever back onto the rivet and returning it to position.
Simplicity and cost: a punched hole is cheap to make and adds no extra parts.
Durability: a mechanical hook is less likely to fail than a tiny spring or latch.
Universal fit: manufacturers size the hole to match the rivet/head so it works across most designs.
Keep it clean: clipped nails and skin oils can accumulate in the hole and pivot — periodically remove the lever (if possible), clean, dry, and apply a drop of light oil to the pivot.
Don’t force it: if your clipper’s lever won’t slide off easily, don’t pry aggressively — you can bend or break the metal.
Avoid misusing as a pry or sharp tool: the lever/hole is not meant to be a screwdriver or heavy-duty hook. Misuse can bend the lever and ruin cutting alignment.
Travel tip: hooking the hole over the rivet is the best way to prevent the clipper from opening in luggage.
It’s not a secret medical tool, not a pressure point, and not designed to “sharpen” or “file” nails as its primary role.
It’s not intended for heavy-duty hooking or to bear weight — treat it as a small mechanical latch.
Main purpose: latch/lock the clipper closed for safety and compact storage.
Other uses: attach to keyring, reorient lever for cleaning or alternate angle, help access nail-cleaner.
Care tip: clean the pivot and hole occasionally and don’t force the lever off clippers that aren’t designed to be disassembled.
Going on a trip to the beach is what holiday dreams are made of.
A beautiful scene is lying in the sun with warm sand between your toes and the water lapping against your feet
If you want to enjoy the ocean, don’t forget to stay safe in the water. Watch out for waves, and never turn your back on the ocean.
You may know a bit about rip currents and changing tides, but you might not know how dangerous square waves are.
Yes, this really does happen, and it’s a beautiful sight. But it’s also one of the scariest things you can see in the ocean.
A square wave, also called a “cross sea,” is made when two waves meet to make a square shape that looks a lot like a checkerboard.
In 2010, the European Space Agency said, “The conditions are quite common in the ocean and occur when a windsea and a swell, or two swell systems, coexist.”
It pointed to a 2004 study that showed “a large percentage of ship accidents occurred in crossing sea states.”
HowStuffWorks went on to state that these square waves don’t happen very often, but when they do, they tend to be near the coast.
Along the western coast of France, on the Île de Ré, is a great place to see them from a safe distance.
It can be hard for boats and swimmers to get through these cross-seas because they can make waves up to 10 feet high and change the way the wind blows.
Again, this is very unlikely to happen, but if it does, don’t go out on a boat or swim in the water, because it might be rough.
You could instead spend your time sitting on the sand or taking a quick dip in the shallow water until the weather is better. Then you can go into the water safely and without crowds.
When you’re in the water, you might not notice that the waves are arranged in a grid, but you might notice that the swells get bigger and you have to swim against two different currents.
Not swimming out so far in the first place is best, and getting out of the water as soon as the waves get too big is also best.